Kids love trading cards. Now you can use Bible Trading Cards to help
students
learn about the characters, places and events in your lessons.
Kids love trading cards. Now you can use Bible Trading Cards to help
students
learn about the characters, places and events in your lessons.
These are large PDF files, which you can save to your computer.***
New Testament
13 Mary
* Gabriel
14 Joseph
15 Zacharias
16 Elizabeth
17 John the Baptist
18 Jesus (as a boy)
19 Simeon & Anna
20 Nicodemus
21 John
22 James
23 Andrew
24 Peter
26 Pharisee and the Publican
27 Two Sons
28 Rich Fool
29 Rich Man & Lazarus
30 Lost Sheep
31 A Man's Treasure
32 Sower
33 Faith as a Mustard Seed
34 Leaven
35 Prodigal Son
36 Talents
37 Good Samaritan
38 Thaddeus
39 Philip
40 Bartholomew
41 James the Less
42 Judas Iscariot
43 Matthew
44 Thomas
45 Simon the Zealot
46 Lazarus
47 Zacchaeus
48 Mary (anoints Jesus)
49 Herod Antipas
50 Pharisees
51 Scribes
52 Saduccees
53 Annas & Caiaphas
54 Widow who gave all
55 Malchus
56 Pontius Pilate
57 Joseph of Arimathea
58 Mary Magdalene
59 Crucifixion
60 Gethsemane
61 Jesus Ascends
62 Matthias
63 Peter's Sermon
64 Lame Man
65 Peter & John Arrested
66 Ananias & Sapphira
67 Stephen
68 Simon the Sorcerer
69 Philip
70 Saul
71 Cornelius
72 Agabus
73 Barnabas
74 Lystra
75 Timothy
76 Philippian Jailor
77 Silas
78 Athens
79 Aquila & Priscilla
80 Demetrius
81 Eutychus
82 Apollos
83 James (brother of Jesus)
84 Felix
85 Festus
86 Agrippa
87 Malta
*MSWord format card
contributed by fellow teacher
***these are the free files designed for easy
downloading (quality may vary from our custom printed sets).
Old Testament
88 God
89 Adam
90 Eve
91 Satan
92 Cain & Abel
93 Noah
94 Babel
95 Abraham
96 Lot
97 Ishmael
98 Isaac
99 Esau
100 Jacob
101 Rachel
102 Joseph
103 Potiphar
104 Benjamin
105 Reuben, Levi, Simeon
106 Asher, Gad, Dan, Naphtali
107 Issachar, Judah, Zebulun
108 Jochebed & Amram
109 Miriam
110 Moses
111 Aaron
112 Pharaoh
113 Plagues
114 Red Sea
115 Manna
116 Water from a Rock
117 God's Covenant
118 Golden Calf
119 Ten Commandments
120 Tabernacle
121 Nadab & Abihu
122 Twelve Spies
123 Korah
124 Brass Serpent
125 Balaam
126 Joshua
127 Rahab
128 Crossing Jordan
129 Jericho
130 Achan
131 Gibeonites
132 Twelve Tribes of Israel
133 Deborah
134 Gideon
135 Samson
136 Ruth
137 Eli
138 Philistines
139 Samuel
140 Saul
141 Goliath
142 Michal
143 David
144 Jonathon
145 Joab
146 Uzzah
147 Bathsheba
148 Absalom
149 Nathan
150 Solomon
151 Temple
1 Elijah
2 Jonah
3 Isaiah
4 Daniel
5 Ahab
6 Josiah
7 Hezekiah
8 Jeroboam
9 Elisha
10 Esther
11 Nehemiah
12 Shadrach, Meschach, Abednego
The cards are in PDF format. This is the only way you can print them so the front and back match up exactly. Download the pdf viewer called Adobe Acrobat Reader for free from Adobe.
These files can be quite large, because of the graphics. Give them time to load. The fonts look choppy on screen but print correctly.
Print the cards on card stock or bright white paper. You may have to experiment to see what direction makes the front and back line up. Glossy or thick paper will help keep ink jet ink from soaking the page.
One user had to tell his Epson print driver to center the page to the paper, not maximize the print area. If you're having trouble aligning the sides, check your print setup to see if this is possible.
See the FAQs below for a teacher's method of creating custom sets.
Laminate the cards for durability. You can buy Self-Adhesive Laminating Sheets, or take the full sheets to an office supply store to have them laminated.
A fellow teacher reports success by printing the pages separately, inserting them into wallet-sized laminating pouches, and sealing them with an iron (using a towel between the iron and the pouch).
Cut them to make your own trading cards. A good rotary paper cutter is helpful. I round the corners using for safety's sake and to make them look professional. Scrapbooking suppliers sell corner-rounders, although the laminate sticks in the inexpensive ones. I have successfully used a round section of decorative scissors to round them.
Office Depot and other office supply stores provide these kind of supplies.
-
Use the cards as incentives for completing lessons or attending class.
-
Review character information:
-
Use them as Flash Cards for memorizing characters.
-
Lay out the cards graphic-side up. Read facts from the back and have students pick out the person you describe.
-
Give students cards of a character in the story. Tell them to hold up the card when their character’s name is mentioned.
- Additional review activities
-
Using Multiple Sets
-
Have students sort the characters by when they lived using the time line.
-
Have students sort the packs into categories, such as apostles, prophets, etc.
-
Print one side to make concentration cards.
-
Help students keep track of the cards by getting them clear plastic storage pages like they use for Pokemon cards.
-
If you come up with a great way to use the cards, let me know and I'll share it here!
What age groups are the cards for?
The cards include a good deal of text, and readers get the most benefit from them. Upper grade school and lower middle school seem the most enthralled with the cards. But the preschoolers and early readers memorize the images on the front, and grow into the cards. We have had success with grades K-8. We've been thrilled with the enthusiasm that our grade school boys have shown for the cards.
I'm having trouble getting to the cards. What's the matter?
Do you have the free Adobe Acrobat Reader? If not, download it here. The files will not open without it.
How long did you wait for them to open? The files are extremely large and Adobe does not always show you that it is loading the page. Give it some time.
Try this: Instead of trying to open the file, Right-click on the link and choose Save Target As... This will save the file to your computer without also trying to open Adobe at the same time. Then you can log off and open the file at your leisure.
Why are the cards numbered as they are?
I started making these cards when teaching a multitude of prophets, kings and characters in the Old Testament to primary students. I started numbering with the first cards I made.
Why are the edges uneven? Why doesn't it all print?
I tried to add extra color on the outside of the cards to add a little flexibility to cutting them. Your printer may have different margins and may not print it all. Some ink jet printers require a .6 inch margin on one edge, which may cut a little off one side. (I used .5 inch margins all around). If your print driver has a "maximize the print area" function, you'll have to turn it off.
How many are you going to make?
I now have over 150 cards covering the entire Old and New Testament, a major goal which took three years. With the completion of the Old Testament, I am going to focus more on the lessons again. Additional booster sets may become available in the future.
 How did you make the cards?
I use CorelDRAW to format and alter the clip art from Bible Clips, a terrific clip art program.
Why do some cards have two per page, some one, and some four?
This is how I originally created the pages. I decided it would be better to get the cards uploaded than to wait until I reformatted all the cards.
What if I don't need all the cards you have?
A helpful teacher, Thomas J. Cook, shares how he customizes the sets for his curriculum:
"I started out by using the .PDF files you provide, and that worked well. With 20 or so kids enrolled, though, I have been preparing 16 of each card for each lesson. This means that I have a lot of cards which do not fit our curriculum (at least at this point). So I figured out a way to make my own sheets of eight of a single card (or mix and match in other ways) so I can fit the cards to the lesson.
"I've attached a copy of my MS Word 97 template, which is simply a 4x2 grid of text boxes set up to align front and back (at least it does on my Epson Color 600 printer...I would think it would work on others as well, but could require a little tuning). Here's the process:
1) Use the graphics select tool to cut the desired card image using Acrobat Reader. It is important to use the highest zoom level possible to get the best resolution in the final result.
2) Paste the clipboard image as a "new image" into a graphics editor. I use PaintShop Pro.
3) Resize the image to exactly 3.5" by 2.25". This may require a combination of resize and canvas size, but is necessary to retain the proper layout. Alternatively, you can resize the image to any dimensions with the same proportion (1:1.555). The correct aspect ratio is essential.
4) Copy the image and past into each of the text boxes in the first page of the template.
5) Repeat with the reverse side of the card, pasting to the second page of the template.
You can make mixed sheets of two or more cards if you wish, but remember that one page reads right-to-left, while the second page reads left-to-right. Top and bottom are maintained, of course. This technique takes a while the first time, but with practice it becomes rather routine and allows optimum use of ink, paper, and printer time."
Why are the cards in PDF format?
This is the only way you can print them so the front and back match up exactly. Download the pdf viewer called Adobe Acrobat Reader for free from Adobe.
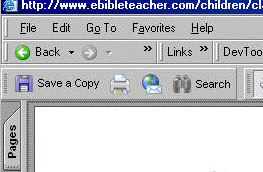
How Can I Save These Files to My Computer?
When the file opens in the Adobe PDF browser, the PDF toolbar has a blue Save A Copy (see below) icon that looks like an old floppy disk. Click on that button and tell the reader where on your computer you'd like to save the file. Saving the file allows you to access it more quickly (since it's not downloading), use it when offline, and saves us on server costs, too!
These cards are provided "as is" and may or may not contain unintentional errors.
|